
What is it?
Single sign-on (SSO) allows users to sign in automatically without having to input their username and password each time they log in.
With SSO, the organizational details of each user, coming from your organization's active directory, are synchronized with your ITONICS application. This allows mapping user roles and groups so that users are signed in to the appropriate roles, groups, and permissions.
Our professional services team will guide and instruct your IT department on the initial one-time configuration that is necessary to configure the standard SSO protocol SAML 2.0.
How does it work?
Login with SSO
- Use the ITONICS system URL from any web browser
- When you land on the ITONICS Login Page, click on the button Login for <client> employees. You will be redirected to your SAML Identity Provider (e.g. Active Directory Federation Services, Azure ADFS or OneLogin. Most SAML Identity Providers are compatible). An automated redirection when hitting the URL is also configurable.
- You will be asked to authenticate with your credentials at the Identity Provider.
- The defined SAML token is sent back to ITONICS.
- The SAML data is verified by ITONICS and if successful, you are authenticated.
- When you complete this process for the first time, the system assigns a defined standard user role, creates a user account in the ITONICS user management, and imports the data defined in SAML claims. This includes attributes like User ID, Username, E-Mail, Firstname, Surname, Location, etc.
The above described the ITONICS standard procedure for setting up SSO, but you can also assign user roles in these two ways:
- User role is assigned by the Application Owner manually.
- User role is assigned via SSO claims based on pre-defined Active Directory Groups on the client-side.
Integrate SSO (initial setup)
Integrating SSO is a little more technical. We recommend getting your IT department to work with ITONICS for the initial setup. Please get in touch with your Customer Success Manager to initiate the integration.
For a smooth integration, the following prerequisites are required:
- Clarify if you need/have a custom URL
- Get a Test User for ITONICS to test the SAML Integration (optional, recommended)
The following steps describe the ITONICS standard integration of SSO/SAML for the initial setup:
- ITONICS sends out the SAML metadata for the production system
- The Customer IT Team imports the metadata in their ADFS
- The Customer sends the metadata back to ITONICS
- ITONICS integrates the metadata of the customer
- After the metadata Exchange is done, the Login has to be tested
- If the Login works fine, the default Login of the system will be changed to SAML
Maintain SSO (configuration self-service)
The initial SSO Setup might be subject to change occasionally. Therefore, ITONICS offers a self-service SSO/SAML Configuration accessible to Administrators, Application Owners, or users assigned the dedicated SAML Manager role.
SAML Manager role
-
Automatically created by ITONICS if the SSO module is enabled
-
Intention: provide a separate configuration access for clients’ IT teams or integration experts, as the (business responsible) Application Owners are not necessarily responsible for the technical setup
-
The SAML Manager role can merely view and manage the SAML Configuration, while prevented from accessing other system locations/content.
-
Initial assignment:
-
Sign in as Application Owner and navigate to the User Management.
-
Create a new or edit an existing user account and assign (only) the SAML manager role, and save.
-
Under Roles, enable SAML Manager and save.
-
Maintaining the SSO/SAML Configuration
Navigate to Settings > System Administration > SAML > SAML Configuration. You will see a table overview, listing the active/inactive IDPs. Once the initial setup has been finalized in alignment with the ITONICS team, a particular IDP item will appear in the table view, with the configuration ready to be managed. For each item, permitted users can either edit or delete the configuration, download the current meta data file (if existent), or upload new client-side metadata file/configuration.

Uploading metadata file
To facilitate the management and maintenance of existing SSO configurations, you can upload your updated metadata file in self-service. Note: You will likely find the metadata URL or metadata file within your IDP portal, e.g., in Azure.

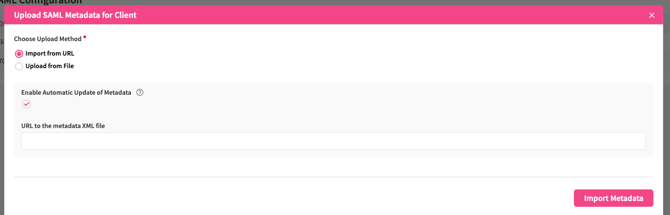
Click on the upload icon for a particular IDP item to open the Upload SAML Metadata for Client pop-up modal. Here, you will have the option to either
-
import the metadata XML file from a dedicated file URL (folder), or
-
upload the file directly without the provision for a target URL.
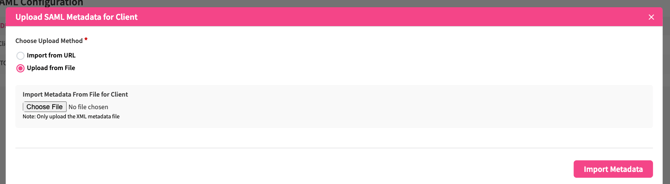
Once you have chosen the upload method, confirm your action by clicking Import Metadata.
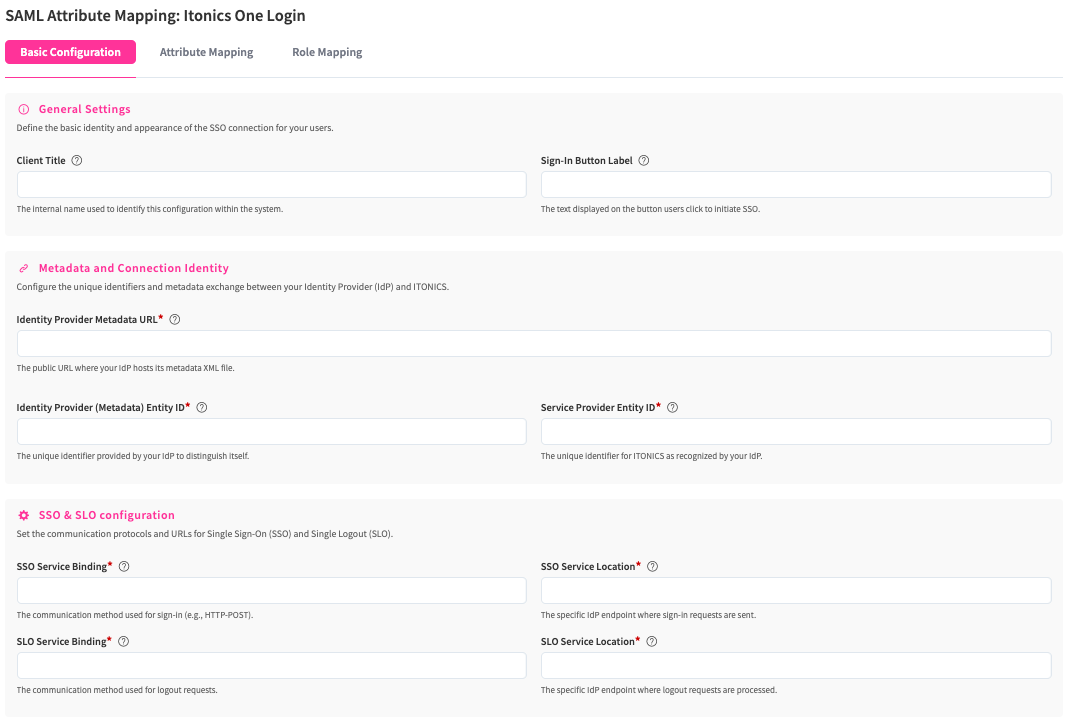
After the successful import of the metadata, click the edit icon for the respective IDP item to now configure the Attribute Mapping based on the uploaded metadata. These will be the attributes you have configured on your IDP portal. The configuration consists of three separate tabs:
Basic Configuration:
General Settings
Define the basic identity and appearance of the SSO connection for your users.
- Client Title: Use a descriptive title to help administrators distinguish between multiple SSO providers in the system.
- Sign-In Button Label: Define the text displayed on the SSO button on the sign-in page (e.g. Sign-in with SSO).
Metadata and Connection Identity
Configure the unique identifiers and metadata exchange between your Identity Provider (IdP) and ITONICS.
- Identity Provider Metadata URL*: Provide the metadata URL or endpoint of your Identity Provider (e.g., Azure AD, Okta, etc.).
- Identity Provider (Metadata) Entity ID*: Specify the unique ID used to validate the authenticity of the metadata provided by the IDP (e.g. https://app.onelogin.com/saml/metadata/{unique_key}).
- Service Provider Entity ID*: The unique identifier for this application (Service Provider) as registered within your Identity Provider.
SSO & SLO Configuration
Set the communication protocols and URLs for Single Sign-On (SSO) and Single Logout (SLO).
- SSO Service Binding*: Select the protocol binding (e.g., HTTP-POST) used to transmit SAML authentication requests, defining the communication method.
- SSO Service Location*: Enter the Identity Provider endpoint URL where the system sends users to initiate the sign-in process.
- SLO Service Binding*: Select the protocol binding (e.g., HTTP-Redirect) used to transmit SAML logout requests.
- SLO Service Location*: Enter the IDP endpoint URL where the system sends logout requests to terminate the user session.
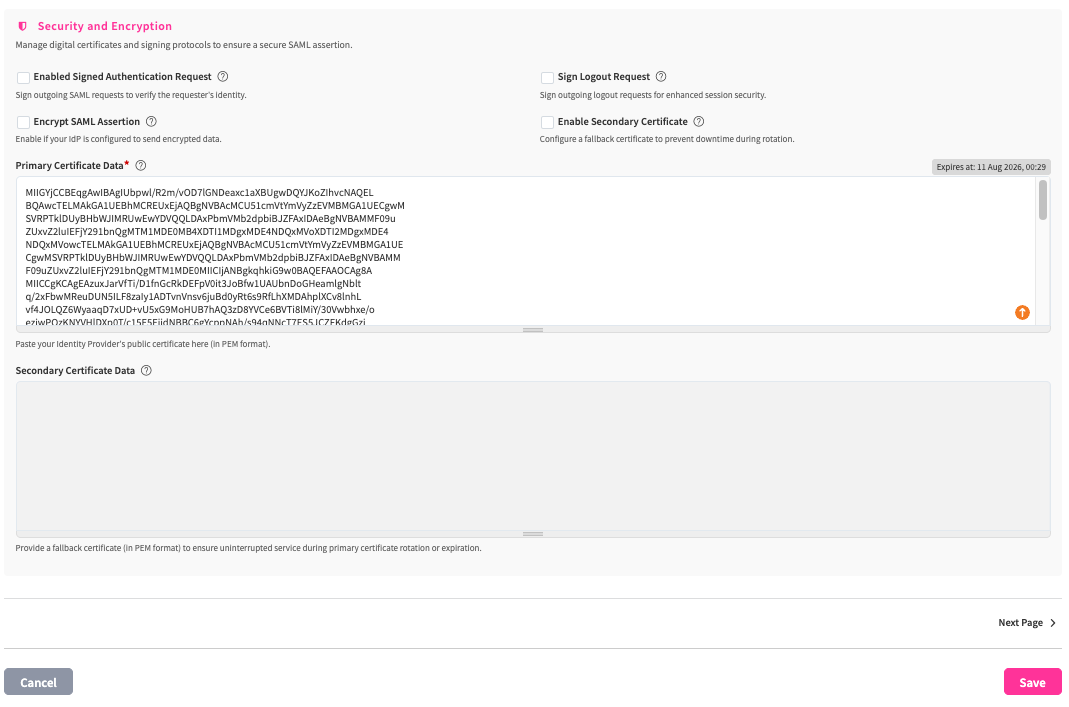
Security and Encryption
Manage digital certificates and signing protocols to ensure a secure SAML assertion.
- Enabled Signed Authentication Request: Enable this to allow ITONICS to digitally sign outgoing SAML authentication requests for enhanced security.
- Sign Logout Request: When enabled, the system will digitally sign all SAML logout requests sent to the Identity Provider. Note: This will only work when a single certificate is enabled. For double certificates, the logout request is automatically signed and cannot be disabled.
- Encrypt SAML Assertion: Require the Identity Provider to encrypt assertion data (SAML responses) to ensure maximum privacy of user attributes during transmission. Note: works only if double certification is enabled.
- Enable Secondary Certificate: Configure a fallback certificate to prevent downtime during certificate rotation.
- Primary Certificate Data*: The public key data required to ensure that authentication responses are legitimately signed by your Identity Provider. Paste your Identity Provider's public certificate here (in PEM format). Note: If there is only a single certificate, the certificate is used for both encryption and signing.
- Secondary Certificate Data: Provide a fallback certificate (in PEM format) to ensure uninterrupted service during primary certificate rotation or expiration.
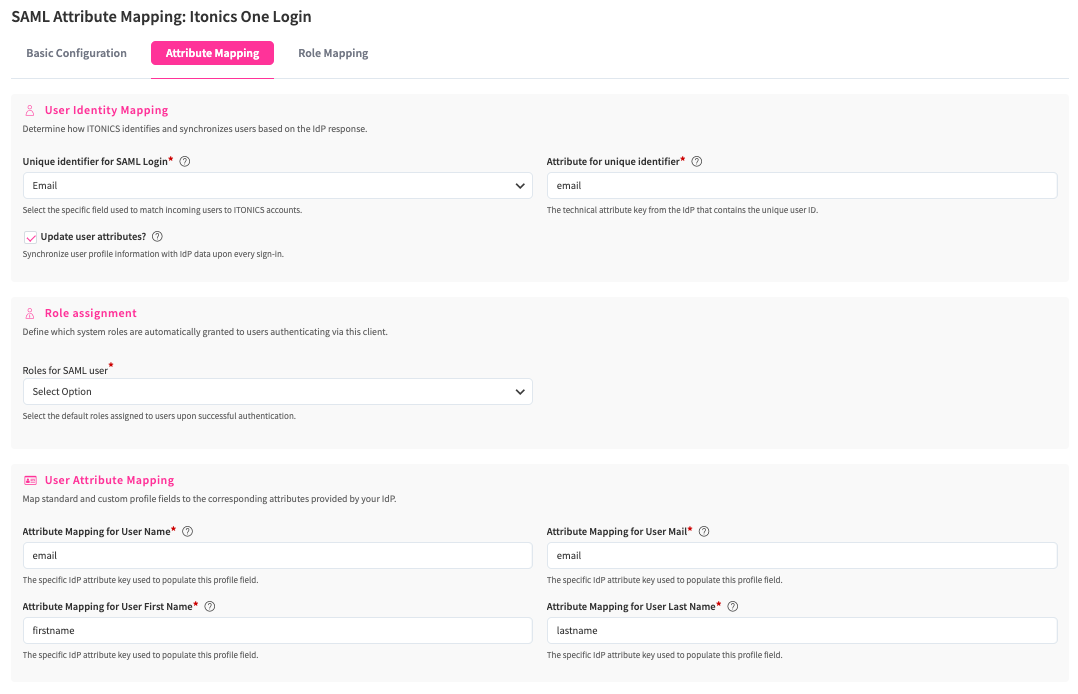
Attribute Mapping:
User Identity Mapping
Determine how ITONICS identifies and synchronizes users based on the IdP response.
- Unique identifier for SAML Login*: Specify the primary, unique attribute used to identify users during sign-in/SAML login. Choosing Email will automatically synchronize the ITONICS username with the IdP email address, and vice versa.
- Attribute for unique identifier*: Enter the attribute name from your IdP that acts as a unique ID (e.g., eduPersonPrincipalName or eduPersonTargetedID). If the attribute is multi-valued, the first value will be processed.
- Update user attributes?: Enable this option if you want to update the user's email or username in ITONICS based on the value selected above and kept in sync with the Identity Provider.
Role assignment
Define which system roles are automatically granted to users authenticating via this client.
- Roles for SAML user*: Select the default roles assigned to users upon successful authentication. This role serves as a fallback when no role mapping rules are defined or when no rule matches. See the Role Mapping tab to configure rule-based role assignment.
User Attribute Mapping
Map standard and custom profile fields to the corresponding attributes provided by your IdP.
- Attribute Mapping for User Name*: Enter the IdP attribute key used to populate the user's name.
- Attribute Mapping for User Mail*: Enter the IdP attribute key corresponding to the user's Email Address (e.g., mail).
- Attribute Mapping for User First Name*: Enter the IdP attribute key corresponding to the user's First Name.
- Attribute Mapping for User Last Name*: Enter the IdP attribute key corresponding to the user's Last Name.
Note: Ensure that the mandatory attribute mappings are filled out, while you can optionally map further SAML attributes to corresponding ITONICS user configuration fields.
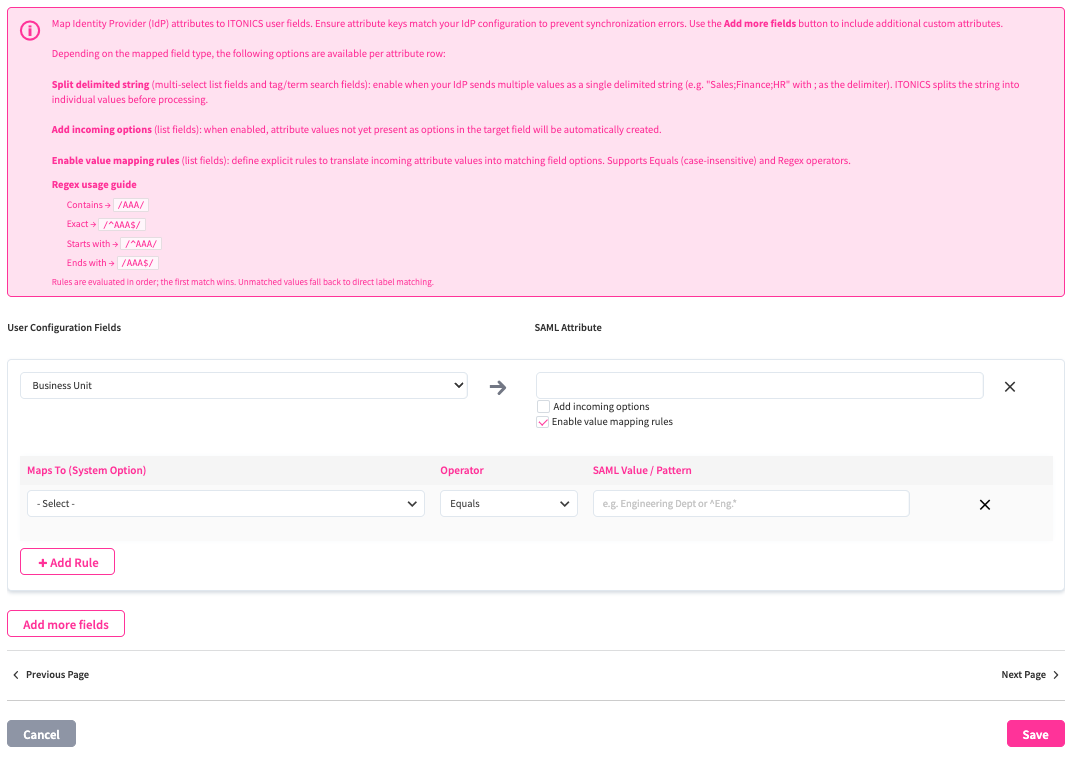
Use the Add more fields button to map additional ITONICS user profile fields to IdP attributes. For each additional field row, a User Configuration Fields dropdown lets you select the target field in ITONICS, and a SAML Attribute text input accepts the corresponding IdP attribute key.
Depending on the mapped field type, the following options are available per attribute row:
- Split delimited string (multi-select list fields and tag/term search fields): enable when your IdP sends multiple values as a single delimited string (e.g. "Sales;Finance;HR" with ; as the delimiter). ITONICS splits the string into individual values before processing.
- Add incoming options (list fields): when enabled, attribute values not yet present as options in the target field will be automatically created.
- Enable value mapping rules (list fields): define explicit rules to translate incoming attribute values into matching field options. Supports Equals (case-insensitive) and Regex operators.
When value mapping rules are enabled for a row, you can define one or more rules. Each rule specifies:
|
Column |
Description |
|
Maps To (System Option) |
Maps To (System Option) |
|
Operator |
Equals (case-insensitive) or Regex |
|
SAML Value / Pattern |
The incoming value or regex pattern to match against |
Rules are evaluated in order; the first match wins. Unmatched values fall back to direct label matching. Use + Add Rule to add additional rules to a row.
Regex usage guide:
- Contains → /AAA/
- Exact → /^AAA$/
- Starts with → /^AAA/
- Ends with → /AAA$/
Note: Ensure that the mandatory attribute mappings are filled out, while you can optionally map further SAML attributes to corresponding ITONICS user configuration fields. Attribute rows where no SAML attribute has been provided are ignored and will not be saved.
Note: Mapping is currently not supported for the following field types: Location search field, User search field, and User Group Search Field (UGSF).
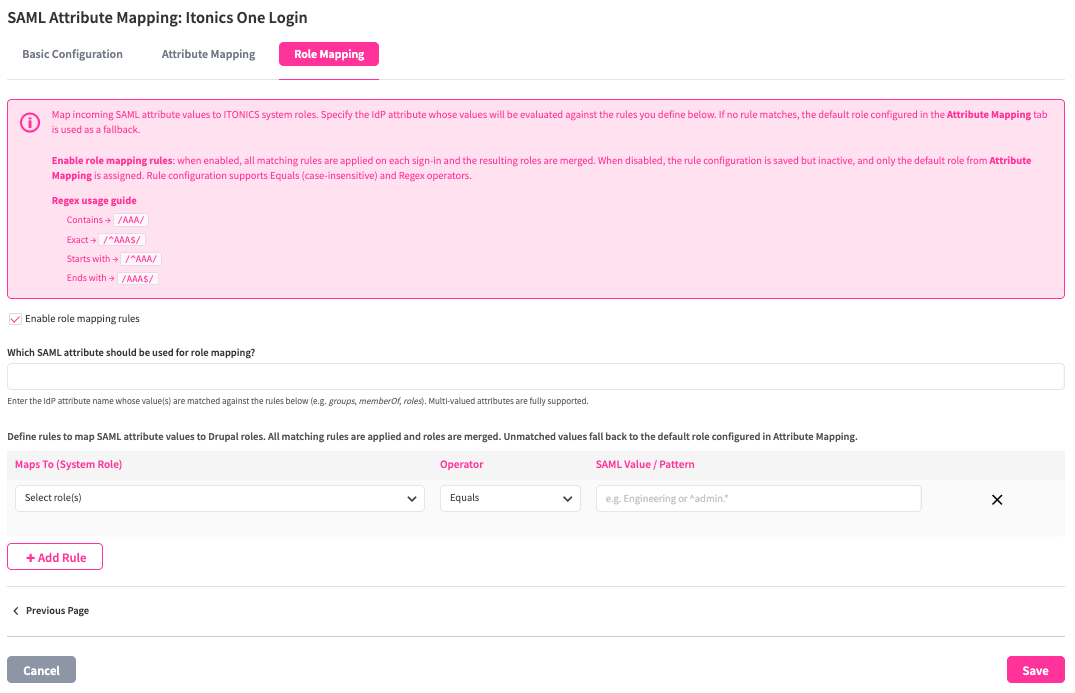
Role Mapping:
Map incoming SAML attribute values to ITONICS system roles. Specify the IdP attribute whose values will be evaluated against the rules you define below. If no rule matches, the default role configured in the Attribute Mapping tab is used as a fallback.
- Enable role mapping rules: When enabled, all matching rules are applied on each sign-in and the resulting roles are merged. When disabled, the rule configuration is saved but inactive, and only the default role from Attribute Mapping is assigned.
- Which SAML attribute should be used for role mapping?: Enter the IdP attribute name whose values are matched against the rules below (e.g. groups, memberOf, roles). Multi-valued attributes are fully supported.
Define rules to map SAML attribute values to ITONICS system roles. For each rule, specify:
|
Column |
Description |
|
Maps To (System Role) |
The target ITONICS system role |
|
Operator |
Equals (case-insensitive) or Regex |
|
SAML Value / Pattern |
The incoming value or regex pattern to match against |
All matching rules are applied on each sign-in and the resulting roles are merged. Unmatched values fall back to the default role configured in the Attribute Mapping tab. Use + Add Rule to add additional rules.
Regex usage guide:
- Contains → /AAA/
- Exact → /^AAA$/
- Starts with → /^AAA/
- Ends with → /AAA$/
Once the configuration is finalized, do not forget to click Save to confirm your configuration changes. To see the changes in affect, you will need to log out and re-login (respectively the changes will be applied to subsequent user registrations/logins).
Logs
To trace configuration changes and potential sync issues, the following log capabilities are exposed:
- SAML Audit Logs = configuration changes who changed what
- SAML Logs = debug logs